

Tech Note 110
This tech note describes how to run the RapidVu program in its Driller Display mode on a drilling or workover rig fitted with the Rapidlogger EDR system: how to select the display, connect to the master and slave units, set up the depth tracking at the start of the job, and use the driller's buttons for slips, tripping and drilling. Wiring and calibration of the rig sensors are covered in the Rapidlogger User Manual and Tech Note 70.
What the Driller Display Is
RapidVu has a standard display and three driller displays made for a touch screen on the rig floor. The Driller Display replaces the small buttons of the standard screen with large touch buttons for the driller, shows every variable from the EDR units in a digital table, charts two tracks against time, and draws the travelling block between the crown and the floor with the block position, the bit depth and the slip state beside it. The two other driller displays, Multi Dial and Back Office, are selected the same way and are not covered in this note.

Figure 1: RapidVu in Driller Display mode: touch buttons and digital table on the left, two chart tracks in the middle, block picture on the right
What Must Be in Place
- A Rapidlogger EDR system: normally a master unit on the rig floor (hookload, block position, top drive torque and RPM, standpipe and casing pressure, pump rates) and a slave unit at the pits (pit levels, return flow) joined over CAN bus (Tech Note 71). The drilling variable list is loaded at the factory; if it has to be reloaded, write the unit's drilling setup file with the Rapidlogger System Utility (Tech Note 43) or ask Rapidlogger for it with the serial number (Tech Note 2).
- The block position calibrated with the Rapidlogger Block Position utility (Tech Note 70): the exact crown-to-floor distance and the crown and floor positions. RapidVu reads this data from the unit every time it connects and uses it to draw the block and to find the hookload and depth channels.
- A PC or touch screen computer on the unit's network (Tech Note 9) with RapidVu 4.108 or later; the current release is 4.120.1. The driller displays need no licence.
NOTE: RapidVu checks the variable list when it connects. It will not run the driller display unless the unit has the variables SlipPositn, SlipLoad, BlockPos, BitDepth, ROPavg and WOB. If one is missing it disconnects with the message 'The following variables were not be found in the header', followed by the names, and 'Please upload the correct .rlv file using Rapidlogger Utility'.
Selecting the Driller Display
- Start RapidVu and open the Display menu.
- Click 'Driller Display'. RapidVu answers 'Please restart RapidVU for changes to take effect.'
- Close RapidVu and start it again. It opens in the Driller Display, and does so at every start from then on, because the choice is saved in the RapidVu configuration file on the PC. A tick mark on the Display menu shows which display is active.
- To return to the standard display, click the ticked item again and restart RapidVu. Choosing '2 Charts' or '4 Charts' on the Display menu also returns RapidVu to the standard display, so leave those alone on the driller's screen.
Connecting to the EDR Units
Press the Rapidlogger button at the top of the button panel. The 'Acquire from Master / Slave Devices' box opens; enter the IP address of the master unit and of the slave unit (the master is 192.168.0.5 unless it was changed at installation) and confirm. RapidVu sets the units' clocks, reads the variable list, reads the block position data and starts recording. The Rapidlogger button turns green, the status bar reads Connected, and the speedometer shows the unit's address. Pressing the green button again stops recording.
If the message 'There was an error in getting the Block Position information from Rapidlogger' appears, the Block Position utility has not been run on this unit. Run it as described in Tech Note 70 and connect again.
The Driller's Buttons
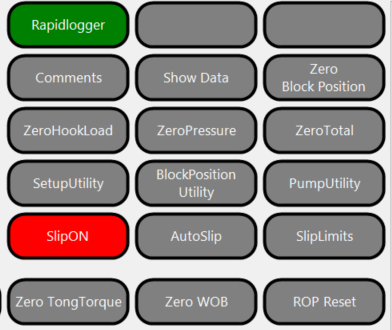
Figure 2: The driller's button panel. SlipON is red because the slips are set
| Button | What it does |
|---|---|
| Rapidlogger | Connects to the master and slave units and starts recording; green while connected; press again to stop |
| Special Functions | Opens the box for entering or zeroing Slip Load, Pipe Depth, BHA Length, Hole Depth, Ton Mile, ROP Avg, ROP Max, WOB Avg, WOB Max and TDRPM Avg (next section) |
| Comments | Adds a time-stamped comment to the job record |
| Show Data | Shows the recorded data in a table |
| Zero Block Position | Zeros the block position with the blocks at the crown; asks for confirmation |
| ZeroHookLoad | Zeros the hookload with the hook hanging free; asks for confirmation |
| ZeroPressure | Zeros the standpipe and casing pressure |
| ZeroTotal | Zeros the pump stroke totals (Pump1Vol and Pump2Vol) |
| SetupUtility | Opens the Rapidlogger System Utility |
| BlockPosition Utility | Opens the Rapidlogger Block Position utility (Tech Note 70) |
| PumpUtility | Opens the Rapidlogger pump setup utility |
| SlipON | Tells the unit the slips are set; red while on. Greyed out while AutoSlip is on |
| AutoSlip | Automatic slip detection from the hookload; green while on |
| SlipLimits | Sets the hookload difference used by AutoSlip |
| RIH | Marks the string as running in hole; green when the unit accepts it |
| POOH | Marks the string as pulling out of hole; green when the unit accepts it |
| Zero WOB | Zeros weight on bit with the bit off bottom |
| ROP Reset | Restarts the average rate of penetration |
| Zero TongTorque | Not used in the current release |
NOTE: Every zero and reset button acts on the Rapidlogger unit itself, not only on the screen, so the change is also seen on the unit's LCD, in the recorded job file and by any other computer reading the unit. The buttons work only while RapidVu is connected to the hardware; during playback of a file they answer 'Values can only be zeroed if connected to Rapidlogger Hardware'.
Setting Up at the Start of a Job
- Check the block position calibration. If the drilling line has been slipped and cut, or the rig has been moved, run the Block Position utility first (Tech Note 70) so that the crown-to-floor distance and the crown and floor positions are right.
- Connect with the Rapidlogger button.
- Raise the blocks to the crown position and press 'Zero Block Position'. Confirm. The block picture should now show the block at the Crown line.
- With the elevators empty and the hook hanging free, press ZeroHookLoad. Confirm.
- Press Special Functions. In the Hole Depth row type the current hole depth and press Enter. In the Pipe Depth row type the length of pipe in the hole and press Enter, and in the BHA Length row type the length of the bottom hole assembly and press Enter. The unit tracks the bit depth from these values and the block movement from then on.
- In the same box press Zero on the Ton Mile row if the ton-mile count is to start from zero, and on the ROP and WOB rows if the averages and maximums are to start fresh.
- Press SlipLimits and enter the hookload difference that tells the unit the slips have been set, then press AutoSlip so that it turns green. If the rig prefers to set the slip state by hand, leave AutoSlip off and use SlipON instead.
- Press ZeroPressure with the standpipe and casing open to air, and ZeroTotal if the pump stroke totals are to start from zero.
During the Job
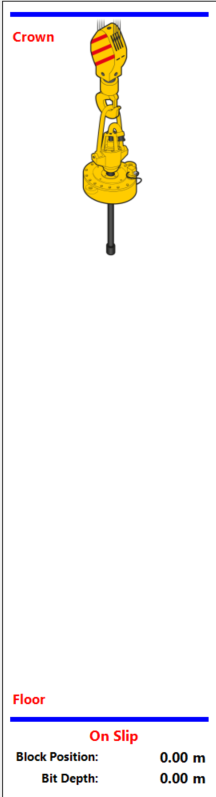
Figure 3: The block panel: crown and floor lines, the block, the slip state, the block position and the bit depth
- The block panel shows 'On Slip' or 'Off Slip'. While the slips are on, the pipe is held and block movement does not change the bit depth. While they are off, the bit depth follows the block. If the bit depth is not following the block, look at the slip state first.
- Before a trip press RIH or POOH so that the unit knows which way the pipe is moving. The button turns green when the unit has accepted the command and red if the command did not get through; press it again after checking the connection.
- With AutoSlip on, the unit sets the slip state itself when the hookload drops by more than the Slip Limits difference. If slips are being detected at the wrong moment, change the difference in SlipLimits: larger if the slips show as set while the string is still hanging, smaller if they are missed.
- While drilling, press Zero WOB with the bit off bottom and the string hanging free, and ROP Reset when a new average is wanted, for example at the start of a stand.
- Use Comments to mark events such as connections, trips and tests. The comments are stored with the data and appear on the chart and in the report.
- The two chart tracks are set up in Display, Chart Options, as on the standard display (Tech Note 7): which variables go on which track, their ranges, and whether to plot against time or depth.

Figure 4: The digital table shows every variable from the master and slave units; the arrows scroll the list
After the Job
- Stop recording with the green Rapidlogger button.
- Choose Report, Report Generate, and select the job type 'Drilling Treatment'. RapidVu fills in the hole depth, circulating hours, ROP maximum and average, top drive torque, weight on bit, top drive RPM and the standpipe, casing and differential pressures from the recorded data, and writes a Word report (Tech Note 26).
- The recorded data is also saved as a text file that opens in Excel (Tech Note 53). The units keep their own copy of the job on the SD card (Tech Notes #19 and #23).
If Something Is Wrong
| Symptom | Cause | Action |
|---|---|---|
| 'The following variables were not be found in the header' | Unit does not hold the drilling variable list | Write the drilling setup file to the unit (Tech Note 43) or ask Rapidlogger for it |
| 'There was an error in getting the Block Position information' | Block Position utility never run on this unit | Run it (Tech Note 70) and connect again |
| Block picture wrong, block above the crown or below the floor | Crown-to-floor distance or zero wrong | Check the distance in the Block Position utility; zero the block position at the crown |
| Bit depth not following the block | Slips shown as on | Check On Slip / Off Slip; press SlipON to release, or adjust SlipLimits |
| RIH or POOH button red | Command not accepted by the unit | Check that RapidVu is connected (status bar) and press again |
| Zero buttons answer 'Values can only be zeroed if connected' | RapidVu is playing a file, not connected to the unit | Connect with the Rapidlogger button |
| Display did not change after choosing Driller Display | RapidVu not restarted | Close and restart RapidVu |
| Standard display came back by itself | 2 Charts or 4 Charts was chosen | Select Driller Display again and restart |
For further help contact support@rapidlogger.com with the unit serial numbers, the RapidVu version shown on the speedometer, and a screenshot of the driller display with the message.